使用 Taro3 + Vue3 + TypeScript + NutUi + Pinia 开发微信小程序
🏆 有任何问题欢迎提 Issues
Vscode 插件安装
- Eslint
- Prettier
- Volar
如何使用
- 克隆项目
git clone https://github.com/Yill625/taro3-vue3-template.git- 进入项目目录安装依赖
cd taro3-vue3-template
yarn install- 运行小程序开发编译
yarn dev:weapp- 打开微信开发工具 项目目录指向 dist 目录 填写自己的 AppId 或者使用测试 AppId
升级 taro 3.4.0
- 支持 Composition API 版本的小程序生命周期钩子 文档
- 支持
<style>v-bind 语法 - 暴露 VueLoader 的配置 文档
- 新增 defineAppConfig 与 definePageConfig 编译宏
当前实现了的功能
- Taro3 Vue3 Ts
Vux4Pinia - 组件库 NutUI
- Eslint Prettier CommitLint
- 小程序分包配置
- Taro3 配合 Vue DevTools 调试
- 样式封装 1px 问题 底部安全区域适配
本项目的搭建过程
一、Taro 基本安装
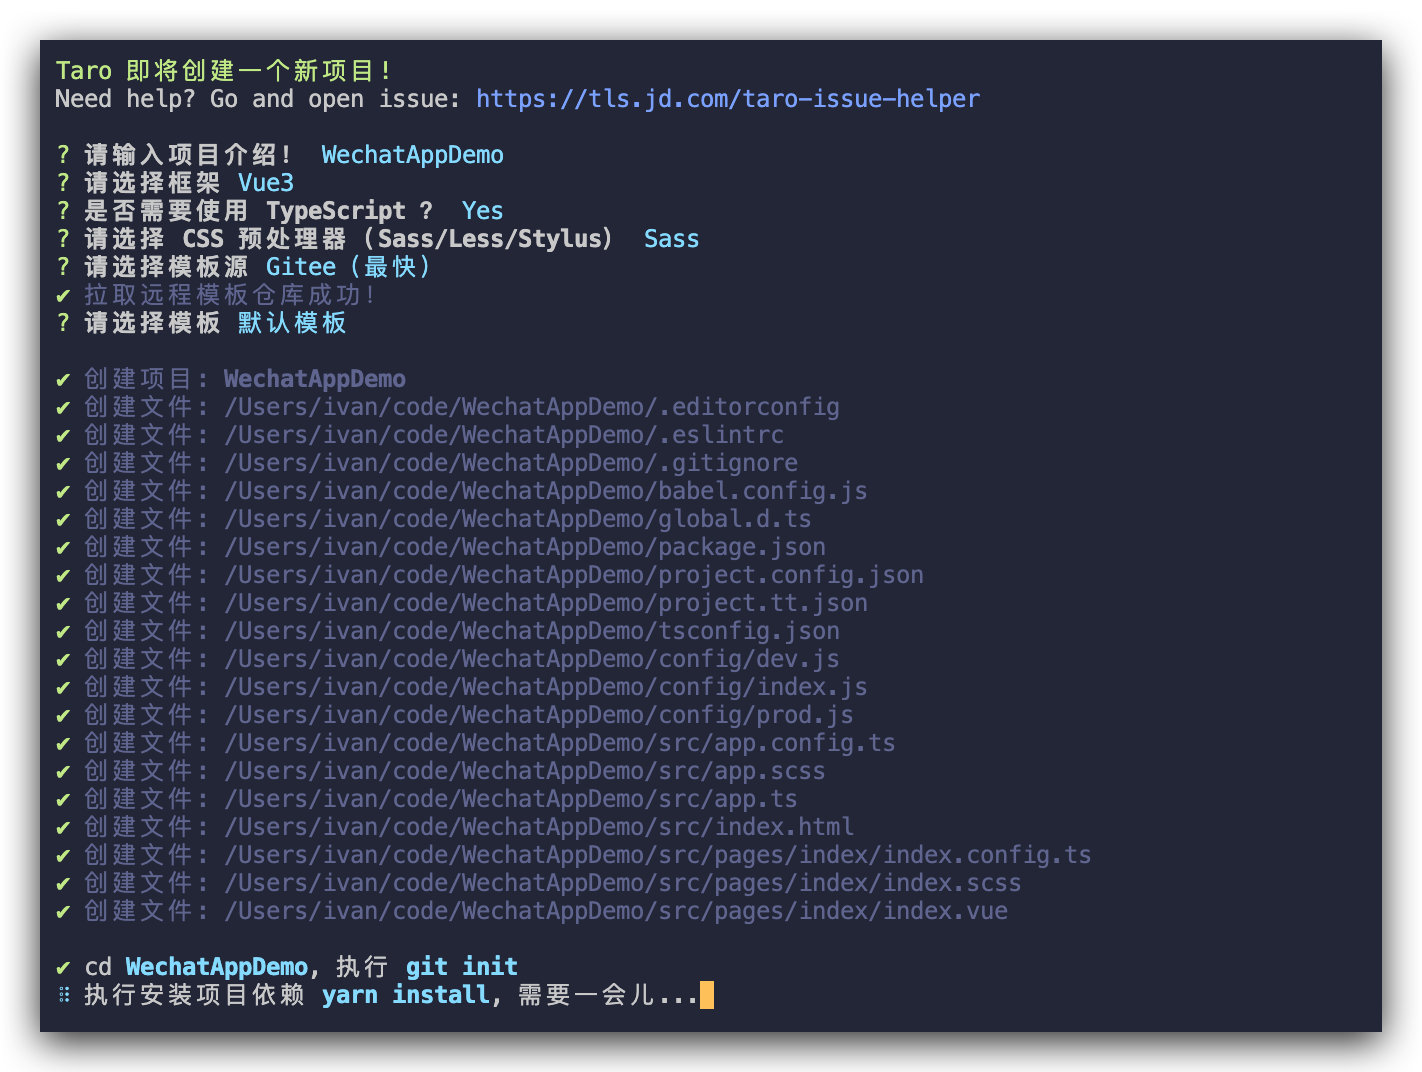
npx @tarojs/cli init WechatAppDemo使用 npx 可以不用全局先安装 cli 工具,直接下载最新 Taro3 工程

本地安装 cli 确保项目基本运行
# 安装cli 用来执行构建等操作
yarn add @tarojs/cli
# 预览
yarn dev:weapp
打开微信开发工具 工程目录需要指向构建出来的 dist 文件


二、设置代码规范的 Eslint Prettier CommitLint
- 代码规范 ESlint
- 代码格式化 Prettier
- 提交规范 CommitLint
1.安装依赖
yarn add @vue/eslint-config-prettier @vue/eslint-config-typescript eslint-plugin-prettier -D2.解决 Eslint 和 Prettier 的冲突需设置.eslintrc.js 和 .prettierrc
3.添加 Ts 检查命令,确保符合 Ts 规范 。添加 Eslint 检查命令,确保符合 Eslint 规范
yarn add vue-tsc -D在 package.json 中 script 添加命令
"scripts":{
  "tsc": "vue-tsc --noEmit --skipLibCheck",
  "lint": "eslint --ext .vue --ext .js --ext .ts src/"
}
4.添加 husky 触发 Git 钩子来保证代码提交时 Ts 检查和 Eslint 检查都符合规范
# https://github.com/typicode/husky
# https://typicode.github.io/husky/#/?id=articles
yarn add husky -D
# 初始化 husky
npx husky install
# 测试命令
npx husky add .husky/pre-commit "echo test"
编辑 pre-commit 执行 Eslint 检查和 Ts 检查

5. 配置 commitlint 提高提交时的规范
yarn add  @commitlint/{config-conventional,cli} -D
# Configure commitlint to use conventional config
echo "module.exports = {extends: ['@commitlint/config-conventional']}" > commitlint.config.js
# Add hook
npx husky add .husky/commit-msg 'npx --no -- commitlint --edit "$1"'
# 首次安装不起作用可以运行 npx husky install
在 Taro3 Vue3 小程序中使用 nutui
Nutui 京东风格的轻量级移动端 Vue 组件库
yarn add @nutui/nutui-taro安装 nutui 会遇到样式的报错 如图 
解决办法:引入 @tarojs/plugin-html 插件 https://taro-docs.jd.com/taro/docs/use-h5
全局引入后的依赖大小 
为了按需引入,先安装插件 babel-plugin-import
# https://nutui.jd.com/#/starttaro
yarn add babel-plugin-import -D
按需引入后的主包大小
import { createApp } from 'vue'
import App from './App.vue'
import { Button, Cell, Icon } from '@nutui/nutui-taro'
import '@nutui/nutui-taro/dist/style.css'
createApp(App).use(Button).use(Cell).use(Icon)
样式处理 因为 nutui 的设计稿是 375 的 所以将框架的设计尺寸调整为 375 
到这里 nutui 组件库已经采坑完毕 能够正常使用 事件调用正常

nutui 事件不触发 是因为 @tarojs/plugin-html 版本不对 我当前这个项目固定设置为 3.3.12 如果设置为最新 3.3.13 则不行
小程序分包配置
随着业务代码和组件的引入越来越多,主包的大小一定会越来越大,超过 2m 的主包以后微信开发工具就无法使用预览的功能,为了提前做好准备在一开始就进行分包处理,主包只包含公共组件和公共代码,分包里放入业务代码和业务代码
//app.config.ts
export default {
  pages: ['pages/index/index'],
  window: {
    backgroundColor: '#fff',
    backgroundTextStyle: 'light',
    navigationBarBackgroundColor: '#fff',
    navigationBarTitleText: 'WeChat',
    navigationBarTextStyle: 'black',
  },
  subpackages: [
    {
      root: 'pages/featureA',
      pages: ['index/index'],
    },
  ],
}
更多优化

使用 script setup 语法在 Taro3 实现小程序页面生命周期方法 替换使用 Taro 3.4.0 新特性
使用 hooks 来封装
// 原来封装代码 废弃
import { getCurrentInstance } from '@tarojs/taro'
import { onMounted } from 'vue'

const Current = getCurrentInstance()

export function useDidShow(callback) {
  onMounted(callback)
  Current?.page?.onShow && (Current.page.onShow = callback)
}
export function usePullDownRefresh(callback) {
  Current?.page?.onPullDownRefresh && (Current.page.onPullDownRefresh = callback)
}
export function useReachBottom(callback) {
  Current?.page?.onReachBottom && (Current.page.onReachBottom = callback)
}
Vuex 安装使用
yarn add vuex@next --save创建 store 目录 添加 index.ts 文件
实现 vuex Ts 的提示 并进行模块化处理
import { createStore, Store } from 'vuex'
import { InjectionKey } from 'vue'

// 定义模块类型
interface User {
  number: number[]
}
export interface State {
  user: User
}
// define injection key
export const key: InjectionKey<Store<State>> = Symbol()

const user = {
  state: {
    number: [1, 2, 3],
  },
  mutations: {
    ADD_NUMBER(state: User, payload) {
      state.number.push(payload)
    },
  },
  actions: {
    addNumber(context, number) {
      context.commit('ADD_NUMBER', number)
    },
  },
  getters: {
    getNumbers(state) {
      return state.numbers
    },
  },
}

const store = createStore({
  modules: {
    user,
  },
})

export default store
安装 Pinia 进行状态管理
yarn add pinia
yarn add taro-plugin-pinia
项目配置文件 config/index.js 中配置:
// ...
plugins: ['taro-plugin-pinia']
// ...
taro3 配合 Vue DevTools 调试

开启 Vue DevTools 之后 预览主包体积会大于 2M 导致无法预览 视情况开启调试 正式构建不会开启 Vue DevTools 调试

默认不开启 devtools 调试 新增 script 开启
"devtools:weapp": "npm run build:weapp -- --watch --devtools"样式封装
公共样式
page {
  font-family: -apple-system, BlinkMacSystemFont, 'Helvetica Neue', Helvetica, Segoe UI, Arial, Roboto, 'PingFang SC', 'miui',
    'Hiragino Sans GB', 'Microsoft Yahei', sans-serif;
}

// 解决iPhone x 以后的机型 底部安全区域的问题 https://jelly.jd.com/article/6006b1055b6c6a01506c87fd
.safe-area-bottom {
  padding-bottom: constant(safe-area-inset-bottom);
  padding-bottom: env(safe-area-inset-bottom);
}
1px 问题
超行省略
细节调整
小程序配置细节
需要注意开发者工具的项目设置:
- 需要设置关闭 ES6 转 ES5 功能,开启可能报错
- 需要设置关闭上传代码时样式自动补全,开启可能报错
- 需要设置关闭代码压缩上传,开启可能报错
其他限制
- 小程序中不支持
<style scoped>,建议使用 cssModules 代替。 - 不能在页面组件的 DOM 树之外插入元素,因此不支持
<teleport> - Vue 3 内部实现使用了 Proxy ,在 iOS 9 及以下操作系统无法运行。但 Vue 官方团队在正式版发布后会推出兼容版本。
- 在 H5 端使用 ref 获取基础组件的 DOM 节点,现在只能得到适配层的 Vue 组件实例,而不是对应的 webComponent 根节点。在 Vue2 里可以通过修改父元素的 refs 属性实现,但 Vue3 中组件间初始化顺序有变化,因此暂时不能支持。
- 小程序端非类似 HTML 表单标签规范的表单组件,如 Picker,暂不兼容 v-model。Vue3 的 v-model 绑定属性改为了 modelValue,事件绑定改为了 update:modelValue。对于 HTML 表单标签会自动对接表单的值与事件,例如 input 会自动对应 modelValue 与 value、update:modelValue 与 @input。但对于 Picker 这种小程序特有表单则无法对应,建议这种情况不使用 v-model。
- VirtualList 组件需要实现一份 Vue3 版本(待实现)
- 所有组件的 id 必须在整个应用中保持唯一(即使他们在不同的页面),否则可能导致事件不触发的问题